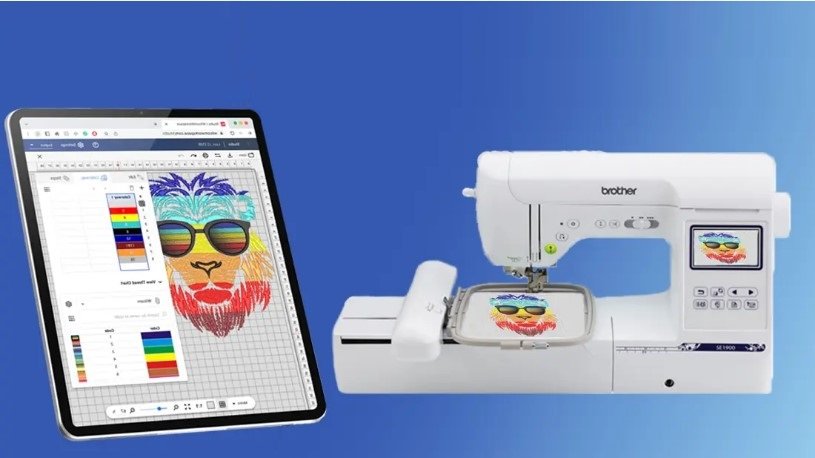
In today’s mobile-first world, creativity isn’t limited to desktops and workstations. Whether you’re traveling, crafting from the couch, or running a business on the go, your iPad can be a powerful embroidery design tool—yes, even for digitizing.
While full-fledged embroidery digitizing software has traditionally lived on PCs, recent advances in iPad apps and cloud workflows now make it possible to digitize embroidery directly from your tablet.
In this step-by-step guide, we’ll walk you through how to digitize embroidery on iPad—from artwork import to stitch-ready export—and how to use it for custom projects like hats, shirts, bags, and more.
Pro tip: If you’re looking for professionally digitized designs or want to ensure your iPad-made file is stitch-perfect, Digitizing Buddy offers expert services in all major machine formats—DST, PES, JEF, and beyond.
What Is Embroidery Digitizing?
Before we get into iPad workflows, let’s quickly revisit what digitizing means.
Embroidery digitizing is the process of converting artwork (like a PNG or SVG) into a machine-readable embroidery file. These files contain stitching instructions like:
- Stitch types (satin, fill, running)
- Directions and angles
- Color changes
- Jump/trims and thread density
Formats like DST, PES, and JEF are common, depending on the brand of machine you use (Brother, Janome, Tajima, etc.).
Can You Really Digitize on iPad?
Yes! While you won’t get 100% of the features of desktop giants like Wilcom or Hatch, there are several great iPad apps that support:
- Vector drawing
- Stitch simulation
- Exporting to machine formats (with workarounds)
- Integration with cloud-based digitizers
The iPad excels for:
- Sketching out embroidery concepts
- Creating SVGs or vector files
- Modifying and coloring designs
- Collaborating remotely
And with Apple Pencil support, precision has never felt more natural.
Best iPad Apps for Embroidery Digitizing
Here are some of the top tools to help you digitize or prep embroidery designs on an iPad:
| App | Best For | iPad Compatibility |
| Affinity Designer | Creating scalable SVGs/vectors | ✅ Full support + Pencil |
| Procreate | Sketching artwork to digitize | ✅ Pencil drawing |
| Embrilliance Express (web) | Viewing/stitching files | ✅ Cloud-based workaround |
| Inkpad | Vector design (SVG exports) | ✅ Lightweight & free |
| Shapr3D | 3D patches and emblems | ✅ Advanced design |
While these don’t all directly export DST or PES files, they can create files that a digitizer or cloud service can convert into embroidery-ready formats.
Step-by-Step: How to Digitize Embroidery on iPad
Step 1: Sketch or Import Your Design
Use Procreate or Affinity Designer to draw your design directly on the iPad—or import an existing JPG, PNG, or SVG from your files or cloud storage.
- Use high contrast and clean outlines.
- Avoid heavy gradients or blurry images.
- Keep size and resolution in mind (especially for hats or left-chest logos).
Step 2: Convert to Vector Format (Optional)
If you’re using a raster image (like JPG or PNG), converting to SVG or PDF vector format helps keep the lines crisp when digitizing.
- Affinity Designer or Inkpad can vectorize your design.
- Clean up any extra nodes or overlapping shapes.
This step isn’t mandatory, but it gives better results when exporting or sending to digitizing software.
Step 3: Choose Your Stitching Style
Think about:
- Which parts need satin stitches (outlines/logos)?
- Where to use fill stitches (backgrounds)?
- What to leave as running stitch (fine details)?
Use drawing layers to color-code or mark your choices. This makes it easier later when converting to stitch instructions—especially if you’re sending it to a digitizer.
Step 4: Export the File for Stitch Conversion
At this point, your design is ready—but it still needs to become a proper embroidery file.
Export options:
- Save as SVG, PDF, or PNG
- Upload to cloud storage (Google Drive, iCloud)
- Send directly to a digitizer (like Digitizing Buddy)
Pro Tip: When submitting to a digitizing service, include:
- Size in inches/mm
- Machine format needed (e.g., PES, DST, JEF)
- Fabric type (hat, towel, tee, etc.)
- Color preferences (or let them match the thread chart)
Step 5: Import the File into an Embroidery App (Optional)
Apps like Embrilliance Express (desktop with cloud sync) allow you to:
- Preview stitch paths
- Assign thread colors
- Simulate design stitching
You can access these previews from your iPad if you use remote access or cloud sync tools like Dropbox or iCloud Drive.
Step 6: Send to Your Machine or USB
Once your final DST/PES/JEF file is ready:
- AirDrop or email it to your Mac/PC
- Transfer to a USB stick
- Load it into your embroidery machine
Stitch a sample first to verify positioning and tension. Make any adjustments as needed.
iPad Digitizing Use Cases: What You Can Make
Using your iPad, you can prep embroidery for:
- Custom backpacks
- Hat logos
- Shirt branding
- Personalized gifts
- Pet apparel
- Wedding accessories
It’s especially handy for artists, designers, and entrepreneurs who want to turn hand-drawn art into embroidered products.
When to Use a Professional Digitizing Service
iPads are great for creating artwork and prepping designs, but if you want to:
- Guarantee machine-optimized stitch files
- Avoid trial-and-error testing
- Use complex stitch types or effects
- Get professional file formats
…then outsourcing to a trusted service like Digitizing Buddy makes all the difference.
They handle all major file types, including DST, PES, JEF, EXP, VP3, and more—and deliver within 24 hours, complete with thread charts and stitch previews.
iPad vs Desktop for Embroidery Digitizing
| Feature | iPad Workflow | Desktop Workflow |
| Portability | ✅ Excellent | ❌ Limited |
| Full digitizing power | ⚠️ Limited | ✅ Advanced tools (Wilcom, Hatch) |
| Touch/Apple Pencil | ✅ Intuitive for sketching | ❌ Mouse-based |
| Export stitch files | ⚠️ Needs cloud or pro help | ✅ Built-in |
| Collaboration & edits | ✅ Easy on cloud | ✅ Desktop sync |
Use your iPad to create, sketch, and prep—then export to a digitizer or finish the job on a desktop.
Ready to Digitize from Your iPad?
With the right apps and workflow, your iPad can be a powerful tool for embroidery digitizing—whether you’re a crafter, hobbyist, or business owner.
Steps Recap:
- Draw or import your design
- Convert to vector (if needed)
- Prep for stitches
- Export for conversion
- Use a service like Digitizing Buddy
- Load to your machine & stitch!
Want professional help turning your iPad art into a PES or DST file?
Visit Digitizing Buddy and get machine-ready embroidery files—fast, affordable, and done by experts.